Introduction
Login form - a gate though which user logs into application. If it is working well - you don’t notice it - if it is bad - it will always annoy you. Of course it is not only UX/UI problem - there are security implications on server side also. But we will keep these concerns beyond this post scope.
We will have few blog posts on authenticating Angular application. This one will focus on login form. Before diving into login form we will outline what we in a whole for authentication
The project to which we will add login form is a side project of mine. (anvilium.com)
Versions: using latest angular-cli (1.0.0) with angular4(4.0.2)
Plan for authentication
What we need for authentication to work:
I will highlight the points which will be covered in this post.
UX:
- Our login page will consist of two tabs: login and registration
- For user to register we will only ask for email and password
- If user is not authenticated - redirect him to login page
- It should be easy to switch between login/register tabs
- After registering - user needs to click on activation link in email
Technical:
- If user has expired token - try refreshing it (OAuth)
- If user has no token or refresh token failed - redirect him to login page (OAuth)
- We need to limit login attempts (server only)
- Password strength - at least 8 symbols
- User should activate new account in 24 hours before it expires
There is a great post on logins written by Jeff Atwood. We will use some ideas from that post in our login form. https://blog.codinghorror.com/the-god-login/
Login form plan
Quick sketch before I dive into actual work. (Using draw.io)
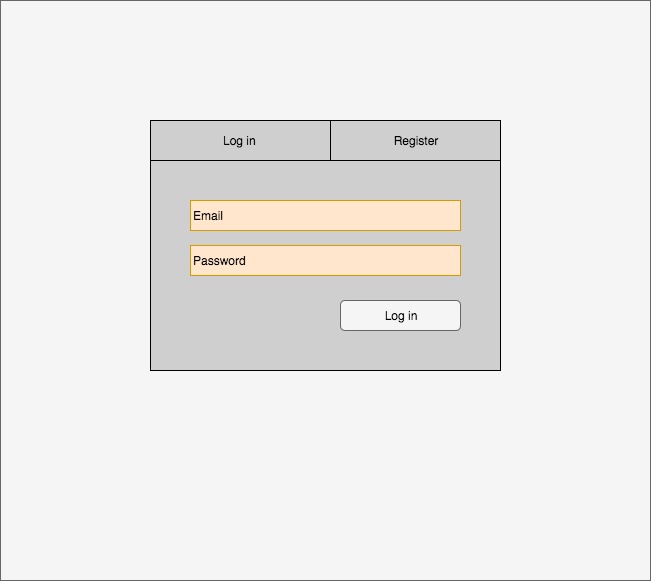
Sorry for poor sketch, but ignoring that - this is how login screen should look. We will add some material look ’n feel to it.
Whole form is in middle of screen, centered. Register/Login are tabs which can be switched easily. Both of those tabs have two fields - email and password. The only difference is button bellow them which indicates action that will performed. (Login, Register). Also after user clicks register - component will indicate to user that he has to click activate link in email.
Code organization considerations: we will need to display login form instead of whole application - it means route for login will need to be at app level. Will create LoginModule and eagerly load it in app.module.
Setup and routing
Setup
First we will create new component in our shared module folder.
cd src/appng g module loginUsing angular-cli scaffolding we will createLoginModulecd loginng g component loginThis will create login component with all needed files and add it toLoginModuledeclarations
Don’t forget to include LoginModule into AppModule imports
Routing for app
Currently our application is routed with navigation menu stuck in one place.
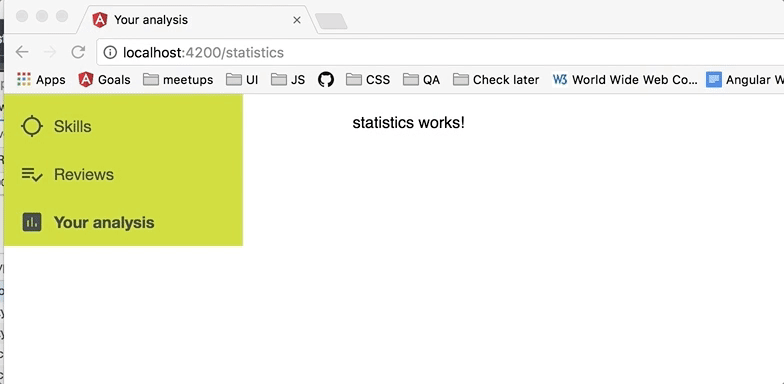
This means we will need to add another router-outlet for app itself and login page
We will move our app.component template to content-main (new component) and instead put router-outlet
You can read more about child route configuration here - https://angular.io/docs/ts/latest/guide/router.html#!#child-route-config
Moving on. Updating app.routing. Moving other routes to path: '' and adding routes as children since they are going to be routed from content-main router-outlet
LoginModule routes will be kept near LoginModule and imported together with module.
export const appRoutes: Routes = [
  {
    path: '',
    pathMatch: 'full',
    redirectTo: 'dashboard'
  },
  { path: '',
    component: ContentMainComponent,
    children: [
      {
        path: 'dashboard',
        loadChildren: 'app/+dashboard/dashboard.module#DashboardModule',
      },
      {
        path: 'reviews',
        loadChildren: 'app/+reviews/reviews.module#ReviewsModule',
      },
      {
        path: 'statistics',
        loadChildren: 'app/+statistics/statistics.module#StatisticsModule',
      },
    ]
  },
  // { path: '**', component: PageNotFoundComponent }
];
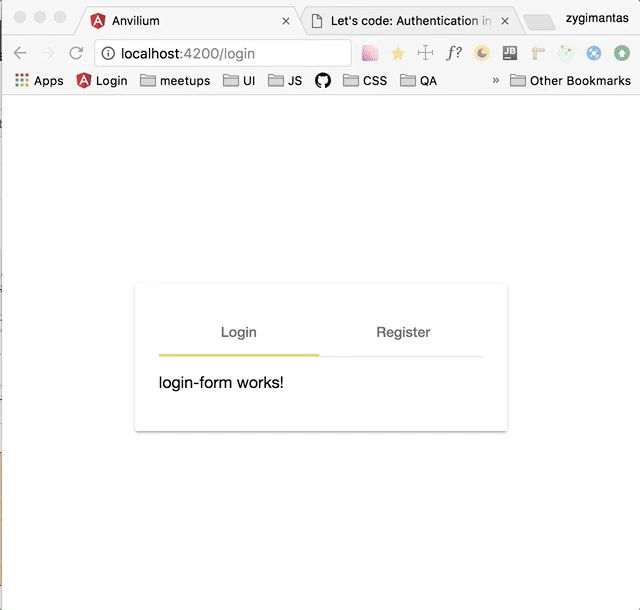
You can see the result:
Routing for login and registration
As discussed, we will have two routes in our login. One will be for login and another for registration. We could not include these into actual web routes - but doing so will let users to bookmark/send links to our application login/registration forms.
First, dummy components for LoginForm and RegistrationForm
In our LoginModule folder:
ng g component login-form
ng g component registration-form
In login.component.html we will need to add router-outlet to change our forms in this module level.
Next, creating login.routing.ts
export const loginRoutes: Routes = [
  {
    path: 'login',
    component: LoginComponent,
    children: [
      {
        path: 'login',
        component: LoginFormComponent,
      },
      {
        path: 'register',
        component: RegistrationFormComponent
      }
    ]
  },

]
and in LoginModule imports we will add this line:
RouterModule.forChild(loginRoutes)
Let’s see.
Presentation “layer”
Next up - form itself. We can use quite a lot of material components here.
First step: get those tabs working. MdTabs (Material tabs) can be easily put to use. Also we will MdCard to get that nice tile looking card.
Import MdTabsModule, MdCardModule and you are ready to go. Grabbing example from https://material.angular.io/components/component/tabs
we end up with this code for tabs:
login.component.html
<div class="login-container"
     fxLayout="column"
     fxLayoutAlign="center center">
    <md-card>
    <nav md-tab-nav-bar>
        <a md-tab-link
           routerLink="/login"
           routerLinkActive
           [routerLinkActiveOptions]="{ exact: true }"
           #rlaLogin="routerLinkActive"
           [active]="rlaLogin.isActive">
            Login
        </a>
        <a md-tab-link
           routerLink="register"
           routerLinkActive
           [routerLinkActiveOptions]="{ exact: true }"
           #rlaRegister="routerLinkActive"
           [active]="rlaRegister.isActive"
        >
            Register
        </a>
    </nav>
    <router-outlet></router-outlet>
    </md-card>
</div>
Two tabs with routerLinkActive to select which one of them is active. exact: true is needed to selected subroute /login/register.
And a little bit of flex-layout magic to center things out
Inputs
Adding few MdInput does the magic
login-form.component.html
<form fxLayout="column">
    <md-input-container fxFlex="100">
        <input mdInput
               name="email"
               type="email"
               [(ngModel)]="email"
               required
               placeholder="Email">
    </md-input-container>
    <md-input-container fxFlex="100">
        <input mdInput
               name="password"
               type="password"
               [(ngModel)]="password"
               required
               placeholder="Password">
    </md-input-container>
    <div fxFlex="33" fxFlexAlign="end">
        <button md-raised-button>Login</button>
    </div>
</form>
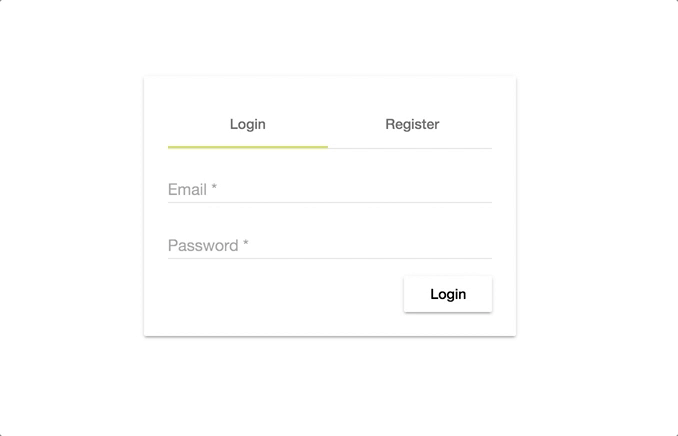
We only check if field is filled but we don’t validate.
Validation
We need to validate if email is “right” and check if passwords strength is OK. We defined requirement to be at least 8 symbols.
I’ll skip custom validator creation - you can read on how to do that in angular docs. https://angular.io/docs/ts/latest/cookbook/form-validation.html#!#custom-validation
Using material’s <md-error> we simply define our validators on inputs and here we have all the stuff we need for them.
login-form.component.html
<form fxLayout="column">
    <md-input-container fxFlex="100">
        <input mdInput
               name="email"
               type="email"
               [(ngModel)]="email"
               required
               validEmail
               placeholder="Email">
        <md-error>Email is invalid</md-error>
    </md-input-container>
    <md-input-container fxFlex="100">
        <input mdInput
               name="password"
               type="password"
               [(ngModel)]="password"
               required
               minlength="8"
               placeholder="Password">
        <md-error>Needs to be at least 8 characters</md-error>
    </md-input-container>
    <div fxFlex="33" fxFlexAlign="end">
        <button md-raised-button>Login</button>
    </div>
</form>
And we are done with login form.
Registration form
It’s simple. We just take what we have and change “Login” to “Register”. You might say duplication of code is bad, but I will argue that in this case its not worth to try to generalize. If our form gets more difficult - we can go ahead and refactor common parts.
One thing to mention - we defined minimum password length on login form. We can delete that from login-form and leave it only on registration-form.
That’s it. We have fulfilled our requirements at the top. Until next time.
You can find part #2 here - https://benetis.me/posts/angular-authentication-oauth/
Feedback
If you have any suggestions - I am eagerly waiting for feedback. https://benetis.me/posts/contact-me/